![[Android, Kotlin] Custom Dialog 만들기](https://img1.daumcdn.net/thumb/R750x0/?scode=mtistory2&fname=https%3A%2F%2Fblog.kakaocdn.net%2Fdna%2FdStgHC%2FbtrniTqKHKg%2FAAAAAAAAAAAAAAAAAAAAAMhnJZErIEuZAi9imLcQtJinbyFN0gw2QEmbcqnoz3_m%2Fimg.png%3Fcredential%3DyqXZFxpELC7KVnFOS48ylbz2pIh7yKj8%26expires%3D1769871599%26allow_ip%3D%26allow_referer%3D%26signature%3DN%252FGxNVHyi2HpcP712WLSVlBEyLY%253D)
만들게 된 이유 : 앱 기능 중 Shared Preference를 이용하여 초기 프로필 이름 설정이 존재. 해당 Dialog를 커스텀하게 만들기 위해.
결과물 :
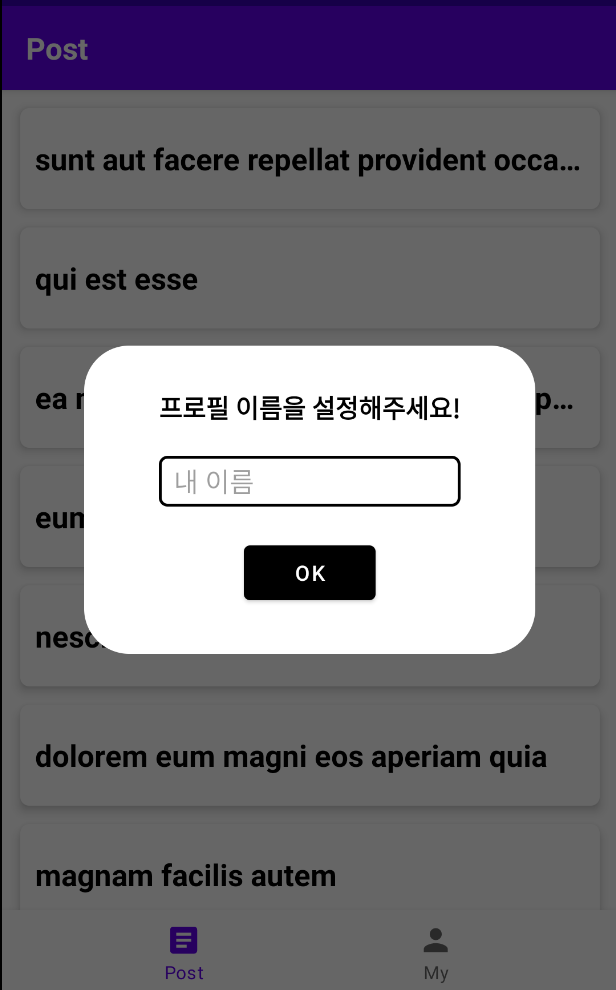
rounded corner + 커스텀 레이아웃으로 다이얼로그를 꾸몄다.
코드 :
// dialog_radius_background.xml
<?xml version="1.0" encoding="utf-8"?><!-- 다이얼로그 배경 -->
<shape xmlns:android="http://schemas.android.com/apk/res/android"
    android:shape="rectangle">
    <corners android:radius="30dp" />
    <solid android:color="@color/white" />
</shape>
dialog의 corner radius를 위한 background xml을 구성한다.
<android:shape="rectangle"> : 사각형 shape
<corners android:radius="30dp" /> : corner radius(둥글기) 30dp 지정
<solid android:color="@color/white" /> : background color white
// dialog_edittext_background.xml
<?xml version="1.0" encoding="utf-8"?>
<shape xmlns:android="http://schemas.android.com/apk/res/android">
    <solid android:color="@color/white"/>
    <stroke android:color="@color/black" android:width="2dp"/>
    <corners android:radius="5dp"/>
</shape>
dialog에 들어가는 EditText의 background xml을 구성한다.
<stroke android:color="@color/black" android:width="2dp"/> : 두께 2dp의 테두리 선 , 색상 black
// dialog_profile.xml
<androidx.constraintlayout.widget.ConstraintLayout
    android:layout_width="wrap_content"
    android:background="@drawable/dialog_radius_background"
    android:layout_gravity="center"
    android:paddingHorizontal="50dp"
    android:paddingVertical="10dp"
    android:layout_height="wrap_content">

    <TextView
        android:layout_width="wrap_content"
        android:layout_height="wrap_content"
        app:layout_constraintStart_toStartOf="parent"
        app:layout_constraintEnd_toEndOf="parent"
        app:layout_constraintTop_toTopOf="parent"
        android:text="@string/set_profile"
        android:layout_marginTop="20dp"
        android:textSize="17sp"
        android:textColor="@color/black"
        android:textStyle="bold"
        android:id="@+id/dialog_title_tv" />

    <EditText
        android:layout_width="0dp"
        android:layout_height="wrap_content"
        android:layout_marginTop="20dp"
        android:layout_marginBottom="20dp"
        android:hint="@string/my_name"
        android:paddingStart="10dp"
        android:paddingVertical="5dp"
        android:id="@+id/profile_et"
        app:layout_constraintBottom_toTopOf="@id/profile_btn"
        app:layout_constraintStart_toStartOf="@id/dialog_title_tv"
        app:layout_constraintEnd_toEndOf="@id/dialog_title_tv"
        android:background="@drawable/dialog_edittext_background"
        app:layout_constraintTop_toBottomOf="@id/dialog_title_tv" />

    <com.google.android.material.button.MaterialButton
        android:layout_width="wrap_content"
        android:id="@+id/profile_btn"
        android:layout_height="wrap_content"
        android:text="@string/ok"
        app:layout_constraintStart_toStartOf="parent"
        app:layout_constraintEnd_toEndOf="parent"
        app:backgroundTint="@color/black"
        app:layout_constraintTop_toBottomOf="@id/profile_et"
        app:layout_constraintBottom_toBottomOf="parent"
        android:layout_marginBottom="20dp" />

</androidx.constraintlayout.widget.ConstraintLayout>
마지막으로, 표시할 custom dialog에 대한 xml layout을 만들면 xml 관련 설정은 끝이다.
눈 여겨 볼 부분은
1. 부모 layout의 background에 만들어 둔 dialog_radius_background.xml을 설정
2. 부모 layout의 height, width를 wrap_content로 설정하고 padding 값을 주어 dialog의 크기를 늘린 것
3. layout_gravity="center"를 주어 dialog가 정가운데 배치되게 한 것
4. EditText의 background에 만들어 둔 dialog_edittext_background.xml을 설정
Design 탭에서 보여지는 xml의 결과물은 다음과 같다.
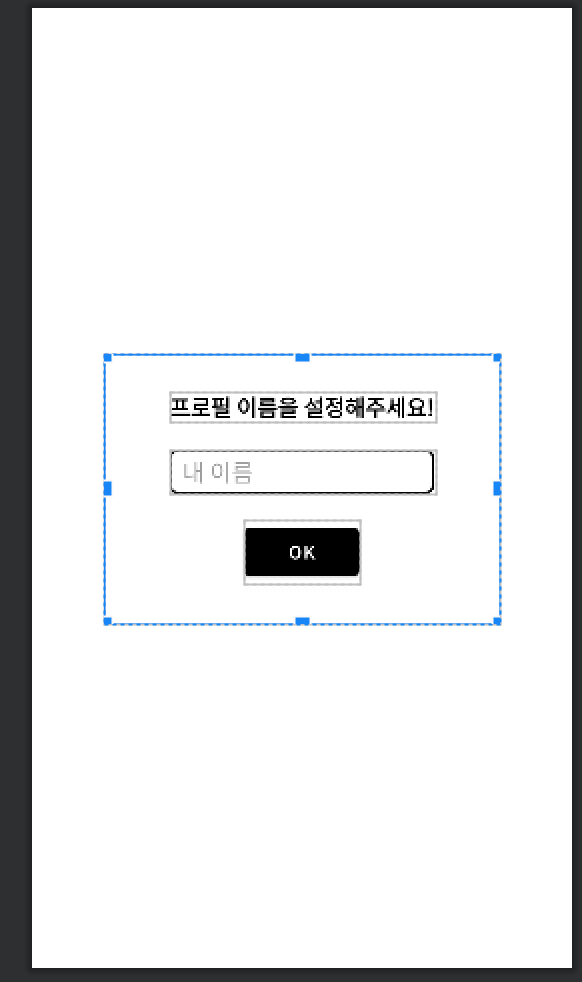
배경이 흰색이라 dialog의 corner radius가 적용된 모습이 보이지는 않지만 corner radius가 적용되었으며, EditText 역시 설정한 background의 모양이 잘 적용되었다.
이제 만들어 놓은 Custom Dialog를 코드를 통해 띄울 수 있도록 한다.
먼저, Dialog 클래스를 상속 받는 CustomDialog 클래스를 만든다. 코드 라인 별 설명은 주석으로 첨부한다.
class ProfileDialog(
    context: Context,
    private val okCallback: (String) -> Unit,
) : Dialog(context) { // 뷰를 띄워야하므로 Dialog 클래스는 context를 인자로 받는다.

    private lateinit var binding: DialogProfileBinding

    override fun onCreate(savedInstanceState: Bundle?) {
        super.onCreate(savedInstanceState)
        // 만들어놓은 dialog_profile.xml 뷰를 띄운다.
        binding = DialogProfileBinding.inflate(layoutInflater)
        setContentView(binding.root)
        initViews()
    }

    private fun initViews() = with(binding) {
        // 뒤로가기 버튼, 빈 화면 터치를 통해 dialog가 사라지지 않도록
        setCancelable(false)

        // background를 투명하게 만듦
        // (중요) Dialog는 내부적으로 뒤에 흰 사각형 배경이 존재하므로, 배경을 투명하게 만들지 않으면
        // corner radius의 적용이 보이지 않는다.
        window?.setBackgroundDrawable(ColorDrawable(Color.TRANSPARENT))

        // OK Button 클릭에 대한 Callback 처리. 이 부분은 상황에 따라 자유롭게!
        profileBtn.setOnClickListener {
            if (profileEt.text.isNullOrBlank()) {
                Toast.makeText(context, "이름을 입력하세요!", Toast.LENGTH_SHORT).show()
            } else {
                okCallback(profileEt.text.toString())
                dismiss()
            }
        }
    }
}
중요한 부분에 대해 한 번 더 짚고 넘어가자면, window?.setBackgroundDrawable(ColorDrawable(Color.TRANSPARENT)) 를 통해 Dialog의 background를 투명하게 만들어주어야 한다.
Dialog는 내부적으로 뒤에 흰색 사각형 배경이 존재하므로, 배경을 투명하게 하지 않으면 corner radius와 같은 디자인이 적용되지 않는다.
이제 만들어놓은 CustomDialog를 View에서 띄워보도록 한다.
// PostFragment.kt
private fun showProfileDialog() {
    ProfileDialog(requireContext()) {
        viewModel.setName(it)
    }.show()
}
ProfileDialog에 띄우고자 하는 Main View의 context와 callback을 넘겨준다.
본 코드에서는 Fragment에서 띄우고자 하므로, *requireContext()를 통해 Activity의 Context를 넘겨주었다.
이제 showProfileDialog() 메소드가 수행되면 Custom Dialog가 띄워지게 된다.
*Activity의 경우에는 최종적으로 Context를 상속받는 ContextThemeWrapper를 상속받으므로,
this와 같은 키워드로 context를 넘겨 줄 수 있으나, Fragment는 그렇지 않다.
Fragment의 경우, attach하고 있는 activity의 context를 **getContext(), requireContext()를 통해 가져와야 한다.
** getContext()는 Nullable로, Fragment가 Activity에 attach 되어있지 않을 경우 null을 반환한다.
requireContext()는 NonNullable로, Fragment가 Activity에 attach 되어있지 않을 경우 IllegalStateException을 반환한다.
requireContext는 context가 NonNullable이어야 할 때 사용하며, Exception을 발생시키므로 주의하여 사용해야 한다.
전체 소스코드 : https://github.com/HunSeongPark/post-sample-hilt-jetpack
GitHub - HunSeongPark/post-sample-hilt-jetpack: 기존 post-sample Repository 공부한 기술들로 다시 만들어보기 (MVV
기존 post-sample Repository 공부한 기술들로 다시 만들어보기 (MVVM, Hilt, Coroutine/Flow, DataBinding, Retrofit, Moshi, Jetpack) - GitHub - HunSeongPark/post-sample-hilt-jetpack: 기존 post-sample Repository 공부한 기술들로 ...
github.com